As a novice gardener, one of the most significant challenges you will face is getting the most out of the little space you have to work with. That's where dividing your square-foot garden into grids comes in. This method allows you to maximize the use of your garden space while making it easy to plant, manage and harvest your crops. Here's a detailed guide on how to divide your square-foot garden into grids:
Step 1: Determine the Size of Your Garden
A square-foot garden typically measures 4 feet by 4 feet. However, if the available space is an odd shape, such as triangular or rectangular, adjust the grid configurations appropriately.
Step 2: Gather Your Tools
To divide your square-foot garden into grids, you will need the following tools:
- Measuring Tape www.amazon.com
- Nails www.amazon.com
- Twine or String www.amazon.com
Step 3: Mark the Corners of the Garden
Outline the gardens boundaries by marking the 4 corners of the garden. You can use nails to mark the corners, not driving them all the way giving you space to tie the twine around the nail. The measuring tape can ensure that the distance between the corners is uniform. Use the measuring tape to measure 4 feet one direction. Then 4 feet in the perpendicular direction, then mark the corners with the nails.
Step 4: Run the Twine Along the Perimeter
Using the twine, connect the nails that mark the corners of the garden perimeter. This step helps you visualize how the garden is going to be divided into grids. This also makes it to where you can just tie the rest of the twine threads on to the perimeter threads making them adjustable for things like growing in groups or making room for trellises.
Step 5: Divide the Garden into Squares
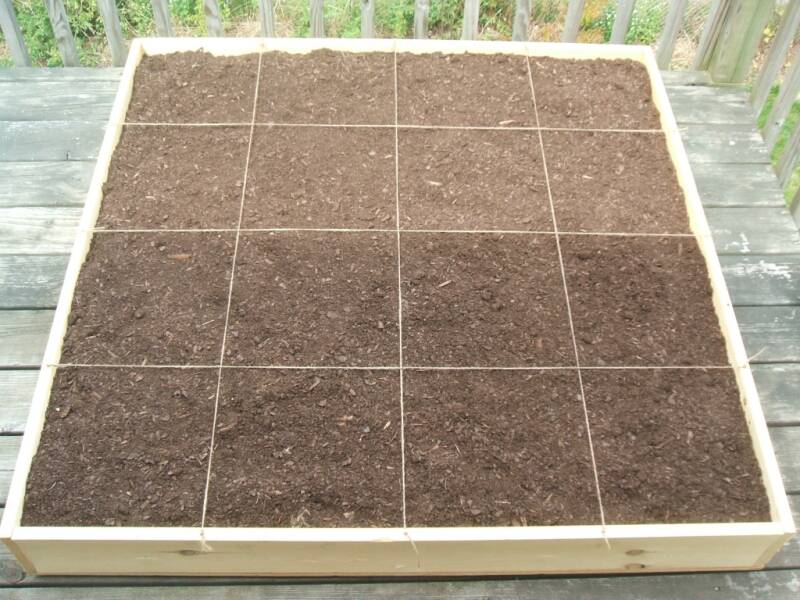
Using the twine, divide the garden into 1-foot by 1-foot sections or 16 equivalent squares. Repeat this process in both directions until you have sixteen squares. If you are group planting, I would still recommend dividing your garden into the 16 squares to visualize it first before you begin grouping.
Step 6: Number the Squares
If you read my previous articles, then you definitely made a garden sketch or got yourself a garden grid planner. Number the squares in your planner, labeling them from 1 to 16, beginning at the upper left corner, proceeding rightward until the first row is numbered to 4, then beginning the next row at that point, continuing in the same direction. You can also take numbered popsicle sticks and place them in the appropriate squares of your garden for a better visual.
Step 7: Start Planting
Once you have marked and numbered your garden grids, you can start planting. Each square represents a specific plant or group of plants. You can grow plants such as cucumbers, tomatoes, peppers, or lettuce in individual square-foot sections.
In conclusion, dividing your square-foot garden into grids is essential to optimize the use of space and maximizes your gardens yield. This method helps you keep your plants organized, makes it easy to manage and track growth, and improves crop rotation. With the above steps, you can easily create a grid system in your square-foot garden and enjoy a thriving harvest.

Your grid twine should look something like this except for added perimeter threads for making the inner threads adjustable based on needs.


Add comment
Comments